Grain spawn is the engine of your mushroom grow. Get it right and everything downstream. colonisation speed, yield, contamination resistance. improves dramatically. Get it wrong and you'll spend weeks watching jars turn green while wondering what you did to deserve this.
I made my own grain spawn from about my third grow onwards, mostly because buying pre-made spawn was costing me fifteen quid a bag and I was going through two or three bags a month. Once you've got the process down, you can produce grain spawn for a fraction of that cost. Here's how I do it.
Why Make Your Own Spawn?
Three reasons: cost, control, and availability. A bag of whole rye grain from an agricultural supplier costs about eight quid for 25 kg. that's enough for dozens of jars. Pre-made grain spawn from a vendor runs ten to fifteen pounds for 1-2 kg. The maths is obvious.
Control matters too. When you make your own spawn, you know exactly how it was prepared, how fresh it is, and that it hasn't been sitting in a warehouse for three weeks. You can also choose the grain type that works best for your species and scale up whenever you like.
Choosing Your Grain
There are four grains you'll see used most often in mushroom cultivation. Each has its strengths:
- Whole rye grain. The gold standard. Great moisture retention, good surface area, and most species colonise it enthusiastically. This is what I use for about 80% of my grows. Buy it from agricultural feed suppliers, not health food shops (ten times the price for the same thing).
- Wheat berries. Very similar to rye in performance. Slightly cheaper in some areas. A perfectly good substitute if you can't find rye.
- Millet. Tiny grains mean more inoculation points per jar, which means faster colonisation. Brilliant for species that colonise quickly like oysters. The downside is it's fiddly to work with and can clump if not dried properly.
- Oats. Cheap and available everywhere. The trade-off is they're more prone to going mushy if you oversoak them, and they can burst during sterilisation. Fine for a beginner on a budget, but rye is better long-term.
I'd strongly recommend starting with whole rye. It's forgiving, widely available from places like farm supply shops, and there's tons of reference material for it. Once you're comfortable with the process, experiment with others.
Cleaning and Soaking
Your grain will arrive dusty and full of broken bits, so the first step is a good rinse. Dump it into a large bucket, fill with water, and stir vigorously. The debris and empty husks will float to the top. pour them off. Repeat two or three times until the water runs reasonably clear.
Soaking: Cover the cleaned grain with water and leave it for 12-24 hours. I usually set it up before bed and drain it the next morning. The grain should absorb water and swell noticeably. Some people add a splash of gypsum (calcium sulphate) to the soak water. about one tablespoon per litre. which helps prevent the grains from sticking together. I do this and I reckon it helps, though it's not strictly essential.
The no-soak simmer method: If you're impatient (guilty), you can skip the overnight soak and go straight to simmering dry grain for 15-20 minutes. It works, but I find the grain hydration is a bit less even compared to a proper soak plus simmer.
Simmering and Drying
After soaking, drain the grain and transfer it to a large stock pot. Cover with fresh water and bring to a simmer. not a rolling boil, a gentle simmer. Cook for 10-15 minutes, checking regularly. You want the grain to be hydrated throughout but not bursting.
The fingernail test: Take a grain out, let it cool for a second, then press your thumbnail into it. It should squash but not be mushy. If you can see a white starchy centre, it needs more time. If it's falling apart, you've gone too far. it'll still work but you'll have sticky grain that clumps.
Drying: This step is crucial. Drain the grain in a colander, then spread it out on clean towels or a baking sheet. Let it sit for 30-60 minutes, stirring occasionally, until the outside of each grain is dry to the touch. You want the moisture inside the grain, not on the surface. Surface moisture causes grains to stick together in a solid clump during sterilisation, which makes inoculation a nightmare.
I usually set up a fan blowing gently over the grain for about 30 minutes. Works a treat, especially in humid weather.
Loading Jars
I use wide-mouth mason jars. either 500ml or 1-litre size. The wide mouth makes inoculation and spawning out much easier than narrow-neck jars.
Modified lids: Drill a 6mm hole in each lid and cover the inside with a square of micropore tape. This allows gas exchange during colonisation while filtering out contaminants. Some people stuff a bit of polyfill into the hole instead. both work fine. You can also add a self-healing injection port (a blob of RTV silicone) if you plan to inoculate with a syringe.
Fill each jar about two-thirds full. Not more. the grain expands slightly during sterilisation and you need room to shake the jar later. Cover the top loosely with aluminium foil to prevent water from the PC dripping onto the micropore tape and saturating it.
Pressure Sterilisation
This is the step that separates grain spawn from grain soup. You need a proper pressure cooker. one that holds at least 15 PSI. The Presto 23-quart is the standard recommendation, and I've used mine hundreds of times without issue. You can find them for about forty to sixty quid.
Load your jars into the PC with a trivet or rack at the bottom to keep them off the direct heat. Add about 5 cm of water to the bottom. Bring to 15 PSI and hold it there for 90 minutes for quart-sized (1 litre) jars. For half-pint (500ml) jars, 60 minutes is sufficient, but I do 90 anyway because it costs nothing extra and gives me peace of mind.
Critical: Let the pressure cooker cool down naturally. Do not release the steam valve manually. Rapid pressure changes can crack jars and suck contaminants into them through the filter. I usually sterilise in the evening and leave the PC to cool overnight. By morning, the jars are room temperature and ready to inoculate.
Inoculation Methods
There are three main ways to introduce your chosen mushroom culture to the sterilised grain:
Liquid Culture (LC)
A syringe filled with mushroom mycelium suspended in a nutrient solution. This is my preferred method for most grows. Inject 1-2 ml through the injection port or micropore tape. done. Colonisation is typically fast because the mycelium is already active and hungry. Buy from reputable vendors or make your own once you're more experienced.
Agar Transfers
Cut a small wedge (roughly 1 cm square) from a colonised agar plate and drop it into the jar. You'll need to do this in front of a flow hood or inside a still air box (SAB) to maintain sterility. Agar transfers are excellent because you can select for healthy, vigorous mycelium and avoid any contamination you spot on the plate. This is how I start most of my cultures these days.
Grain-to-Grain (G2G)
Take a jar that's already fully colonised and transfer a spoonful of colonised grain into a fresh jar. This is the fastest colonisation method because you're introducing loads of active mycelium in one go. The catch is you need an already-colonised jar to start from, and you should limit yourself to 3-4 generations of G2G before going back to agar to keep the genetics strong.
For your first grow, a liquid culture syringe is the easiest option. Check out the complete grow cycle guide for how inoculation fits into the bigger picture.
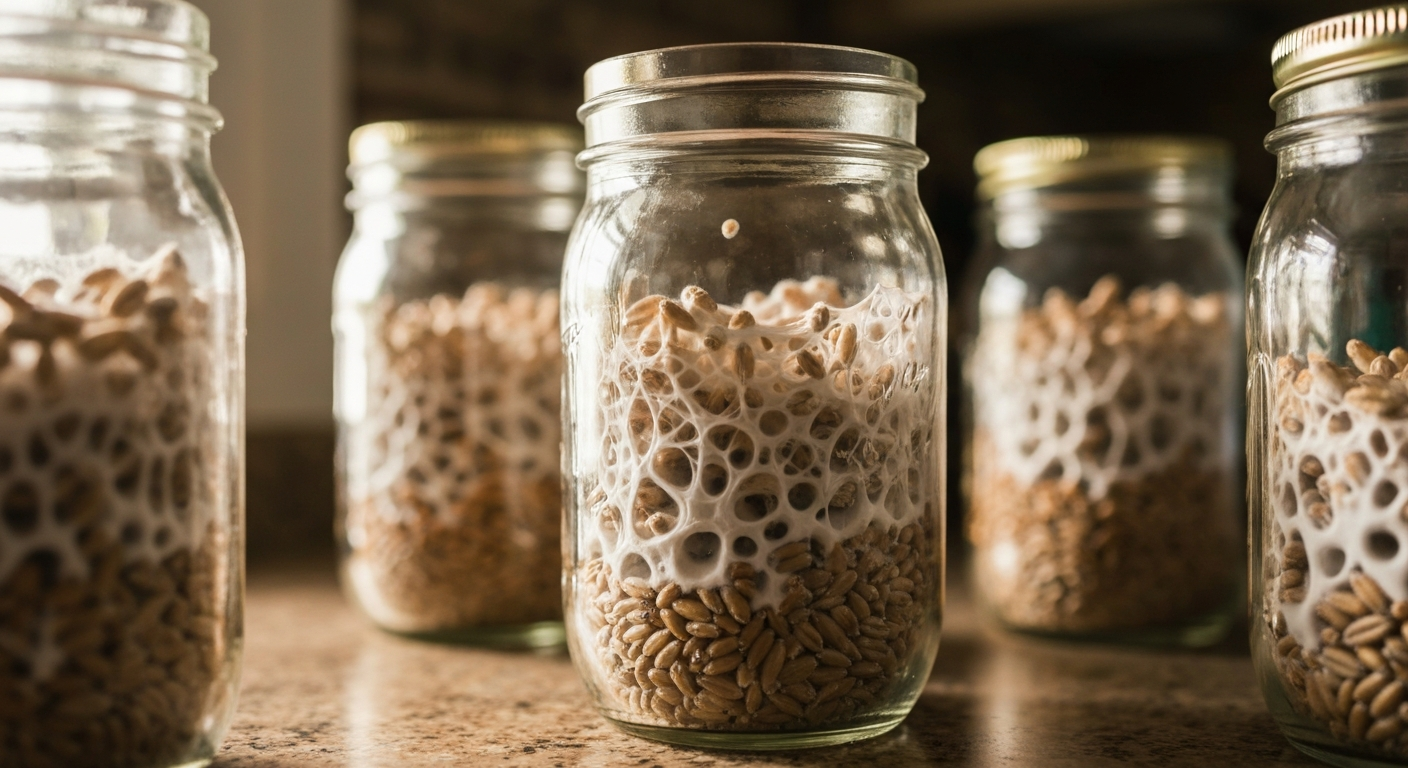
Incubation
After inoculation, your jars need a warm, dark spot to colonise. Temperature is the main variable you can control here:
- 22-25°C is ideal for most gourmet species. Below 20°C and colonisation slows considerably. Above 28°C and you risk encouraging bacterial contamination.
- I keep my jars in a cupboard with a seedling heat mat on a thermostat set to 24°C. Works perfectly. Total cost: about twenty quid for the mat and controller.
- Don't shake for the first 3-5 days after inoculation. Let the mycelium establish at the inoculation point first. After you see visible growth (white fuzzy patches), give the jar a good shake to redistribute the colonised grain. This breaks it up and creates multiple colonisation points, speeding things up dramatically.
- Shake again at about 30% and 70% colonisation. Most jars hit full colonisation within 10-21 days depending on species and method.
Once fully colonised. the entire contents of the jar are covered in white mycelium with no visible uncolonised grain. you're ready to spawn to bulk. See the monotub setup guide for the next step.
Common Mistakes
- Grain too wet. If water pools at the bottom of the jar after sterilisation, your grain was too wet. It'll still work sometimes, but the risk of bacterial contamination goes way up. Dry your grain more thoroughly before loading jars.
- Insufficient sterilisation time. Don't cut corners here. 90 minutes at 15 PSI. Not 60 minutes because you're impatient. Not 90 minutes at 10 PSI because your PC is a bit rubbish. If your PC can't hold 15 PSI, you need a better PC.
- Inoculating warm jars. The grain must be at room temperature before you inoculate. Warm grain will kill your mycelium on contact. Yes, I did this once. Yes, I lost a whole batch.
- Skipping the still air box. You can get away without one sometimes, but your contamination rate will be noticeably higher. A big plastic tub with two arm holes is all you need. costs about five quid. For more on contamination, see our contamination identification guide.
- Using fancy organic grain from a health food shop. Save your money. Agricultural-grade whole rye from a farm supply shop is identical for our purposes and a fraction of the price.
Frequently Asked Questions
What grain is best for mushroom spawn?
Whole rye grain is the most popular choice and what I'd recommend for beginners. It's got a great surface area to volume ratio, holds moisture well, and most species colonise it quickly. Wheat berries are a close second. Millet works well for fast-colonising species like oysters. Oats are cheap and widely available but can be a bit mushy if you oversoak them. not a bad option though if you're careful with hydration.
Can I prepare grain spawn without a pressure cooker?
It's very difficult to get reliable results without one, honestly. Grain needs to be sterilised, not just pasteurised, because the nutrients in it support all sorts of unwanted bacteria and moulds. Some people have success with steam sterilisation in a large stock pot for extended times (90+ minutes), but the contamination rate is much higher. If you're serious about making your own grain spawn, a pressure cooker is the single best investment you'll make. A second-hand one off eBay costs twenty to thirty quid.
How long does grain spawn take to fully colonise?
Typically 10-21 days depending on the species, inoculation method, and temperature. Liquid culture inoculations colonise fastest. sometimes fully colonised in 10-14 days. Agar wedge transfers are similarly quick. Grain-to-grain transfers are the fastest of all. Spore syringes are slowest because spores need to germinate first, so expect 14-21 days or longer. Keeping the temperature around 22-25°C helps speed things along.
My grain jars keep contaminating. What am I doing wrong?
The three most common causes are: not sterilising long enough (run your PC at 15 PSI for a full 90 minutes for quart jars), inadequate cooling before inoculation (wait until the jars are room temperature. inoculating warm grain kills your culture and gives bacteria a head start), and poor sterile technique during inoculation (use a still air box, flame sterilise your needle, and work quickly). Also check that your jar lids are sealing properly and that your polyfill or filter patches aren't coming loose.