My first oyster grow was a disaster. I chucked some spores into a bag of rice, left it on top of the boiler, and wondered why everything turned green within a week. It took me three failed attempts before I actually sat down and learnt the proper process from start to finish. I'm writing this guide so you can skip the frustrating bit and go straight to growing mushrooms that actually fruit.
This is the full picture. every step from buying your first spore syringe to pulling beautiful clusters off a substrate block. I'll be specific about temperatures, timings, and costs, because vague advice is what kept tripping me up as a beginner. If a step has its own dedicated guide on this site, I'll link to it so you can go deeper when you're ready.
The Journey at a Glance
Before we dive into each step, here's the timeline you're looking at so you know what you're signing up for:
- Week 1: Obtain spore syringe, pour agar plates, inoculate plates
- Weeks 2-3: Agar colonises, isolate clean growth, prepare grain jars
- Weeks 3-5: Inoculate grain, incubate until fully colonised
- Week 5: Prepare bulk substrate, spawn to bulk in monotub
- Weeks 5-7: Bulk substrate colonises
- Weeks 7-8: Introduce fruiting conditions, pins form
- Week 8-9: Harvest first flush
- Weeks 10+: Second and third flushes
Total elapsed time: roughly 8-10 weeks from start to first harvest. You can shave a couple of weeks off by skipping the agar stage and going straight from spore syringe to grain, but I'd encourage you to learn agar from the beginning. It's a game-changer for contamination control.
Choosing Your Species
This is the first decision and it matters more than you'd think. Some species are forgiving of beginner mistakes; others will punish every minor slip-up. For your first grow, I'd recommend oyster mushrooms (Pleurotus ostreatus) without hesitation, and here's why:
- They colonise aggressively, which means they outcompete contaminants better than almost any other species
- They fruit across a wide temperature range. 15-24°C covers most UK homes year-round
- They're not fussy about substrate and will grow on straw, coco coir, hardwood sawdust, even cardboard in a pinch
- The yield is generous. 400-800g per flush from a single 60-litre monotub is normal
- They taste brilliant and are expensive to buy in the shops (about £3-4 per 150g punnet)
Once you've nailed oysters, move on to shiitake or lion's mane. Both are fantastic but need a bit more attention to temperature and humidity. If you want a full comparison of beginner species, have a look at the complete beginner's guide to gourmet mushrooms which covers the pros and cons of each in detail.
Getting a Spore Syringe
A spore syringe is a sterile syringe filled with water and mushroom spores. It's the starting point for most home growers. You can also start with a liquid culture syringe (which contains live mycelium rather than dormant spores), and honestly, I'd recommend liquid culture if you can get it. colonisation is noticeably faster.
A decent spore syringe costs £8-12 from UK vendors. Liquid culture syringes run about the same, sometimes a quid or two more. Either way, buy from established sellers with good reviews. cheap syringes from random eBay accounts are a contamination lottery. I've had duds from bargain sellers that contained nothing but dirty water.
What you're paying for is genetics and sterility. A clean syringe from a reputable vendor will have viable spores or mycelium, properly suspended in sterile water, sealed in a sterile syringe. That's worth the few extra quid.
Store your syringe in the fridge (4-8°C) if you're not using it immediately. Spore syringes stay viable for months. Liquid culture syringes are best used within a few weeks. the mycelium is alive and doesn't appreciate being cold-stored indefinitely.
Making Agar Plates
Agar work is where mushroom cultivation goes from "hoping for the best" to actually having control over your results. An agar plate is essentially a petri dish filled with a jelly-like nutrient medium. You put a drop of spore solution on it, mycelium grows out across the plate, and you can see exactly what's happening. clean growth, contamination, vigour, everything.
Here's my basic agar recipe (makes about 20 plates):
- 500 ml water
- 10g light malt extract (from any homebrew shop, about £3 for 500g)
- 10g agar powder (about £5 for 50g online)
Mix the malt extract and agar into the water in a glass bottle or flask. Cap it loosely with aluminium foil. Pressure cook at 15 PSI for 20 minutes. Once it's cooled to around 50-55°C (warm to touch but not burning), pour roughly 15-20 ml into each sterile petri dish inside your still air box. Let them set with the lids slightly cracked for 30 seconds to prevent condensation, then seal.
To inoculate, squirt a single tiny drop. literally one drop. of spore solution onto the centre of a plate. Within 3-7 days you should see white mycelium growing outward from the drop point. If you see anything green, black, or brightly coloured, that's contamination. Chuck that plate and try again with a fresh one. This is why we do agar first. it's far cheaper to lose a plate than a whole jar of grain.
Once you have a plate with clean, healthy mycelium (white and ropey-looking, growing outward in a fairly uniform circle), cut a small wedge. about 1 cm. and transfer it to a fresh plate or directly to grain. Each plate can give you a dozen or more transfers.
Grain Spawn Preparation
Grain spawn is where your mycelium builds up enough biomass to colonise a large volume of bulk substrate. The most popular grain for this in the UK is whole rye, bought cheaply from agricultural feed suppliers for about £8 per 25 kg bag.
The basic process: soak the grain overnight, simmer for 10-15 minutes until hydrated but not bursting, dry it thoroughly on towels, load it into mason jars, and pressure sterilise at 15 PSI for 90 minutes. After cooling to room temperature, inoculate with an agar wedge or liquid culture inside your still air box.
I've written a full guide on this because the details really matter. grain spawn preparation covers every nuance including grain selection, the fingernail hydration test, jar lid modifications, and troubleshooting. It's worth reading through properly before you attempt it.
Colonisation takes 10-21 days at 22-25°C. Shake the jars at about 30% and 70% colonisation to break up the mycelium and create new growth points. this speeds things up massively. When the jar is completely white with no visible uncolonised grain, you're ready for the next step.
Preparing Bulk Substrate
Bulk substrate is the stuff your mycelium will colonise in the final fruiting container. For most gourmet species, CVG (coco coir, vermiculite, and gypsum) is the standard recommendation and what I use for 90% of my grows:
- Coco coir: 650g compressed brick (about £2 from garden centres or pet shops)
- Vermiculite: 2 litres of coarse grade (about £3 for 10 litres)
- Gypsum: 1 cup / roughly 120g (about £4 for 1 kg from homebrew or garden shops)
Break up the coir brick in a large bucket, add the vermiculite and gypsum, then pour roughly 3-4 litres of boiling water over the lot. Mix it, seal the bucket with a lid, and let it sit for at least an hour. ideally overnight. The boiling water pasteurises the substrate, killing off most competing organisms without nuking the beneficial ones the way full sterilisation would.
When it's cooled to room temperature, check the moisture content using the field capacity squeeze test: grab a handful and squeeze hard. You should get a few drops of water. no more than a steady drip. If water pours out, it's too wet. If nothing comes out, it's too dry. Getting this right is genuinely one of the most important things in the whole process. For more substrate options and recipes, see the substrate recipes guide.
Spawning to Bulk
This is the exciting bit. you're combining your colonised grain spawn with the bulk substrate in a fruiting container. I use a modified monotub for this (a 60-litre plastic tub with holes for air exchange). If you haven't built one yet, follow the monotub setup guide.
The spawn-to-substrate ratio matters. I use 1:3 to 1:4 by volume. so for every litre of colonised grain, I mix in 3-4 litres of bulk substrate. A higher ratio of spawn (like 1:2) colonises faster but uses more grain. A lower ratio (like 1:6) is more economical but colonises slowly and gives contamination more time to establish.
The mixing process: line your monotub with a black bin liner. Break up your colonised grain jars into the tub, add the bulk substrate, and mix thoroughly with clean hands or a large spoon. Level the surface gently without packing it down. You want a substrate depth of about 7-10 cm. Some growers add a thin (1 cm) casing layer of pure coco coir on top. I do this about half the time and it helps with moisture retention at the surface.
Close the lid, tape over the air exchange holes with micropore tape, and leave it alone. I mean it. do not open it to peek. Look through the clear plastic walls instead. This colonisation phase typically takes 7-14 days.
Fruiting Conditions
Once the substrate surface is 75-100% covered in white mycelium (I aim for 90%+), it's time to trigger fruiting. You're mimicking the conditions a mushroom would encounter in the wild when it breaks through leaf litter into open air:
- Fresh air exchange (FAE): Remove the tape from the holes, loosen the polyfill, or crack the lid. The drop in CO2 is the primary fruiting trigger.
- Light: Not a lot. ambient room light or a few hours of indirect daylight is plenty. Mushrooms don't photosynthesise, but light does help orient pin formation. I use a cheap LED desk lamp on a timer for 12 hours a day.
- Temperature: A slight drop from colonisation temps helps. For oysters, 18-22°C during fruiting is ideal. Most UK rooms in autumn are naturally in this range, which is one reason autumn is brilliant for growing.
- Humidity: 85-95% relative humidity at the surface. In a properly set up monotub with a sealed lid and polyfill holes, this happens naturally. If the surface looks dry, give a light misting from 30 cm above. aim for the sides and lid, not directly onto the substrate.
The difference between my first (failed) grow and my first successful one was basically this: I stopped fiddling. Set up the conditions and then leave it. Beginners. including me. have a terrible habit of opening the tub every few hours to check. Every time you do that, you're letting humidity crash and introducing potential contaminants.
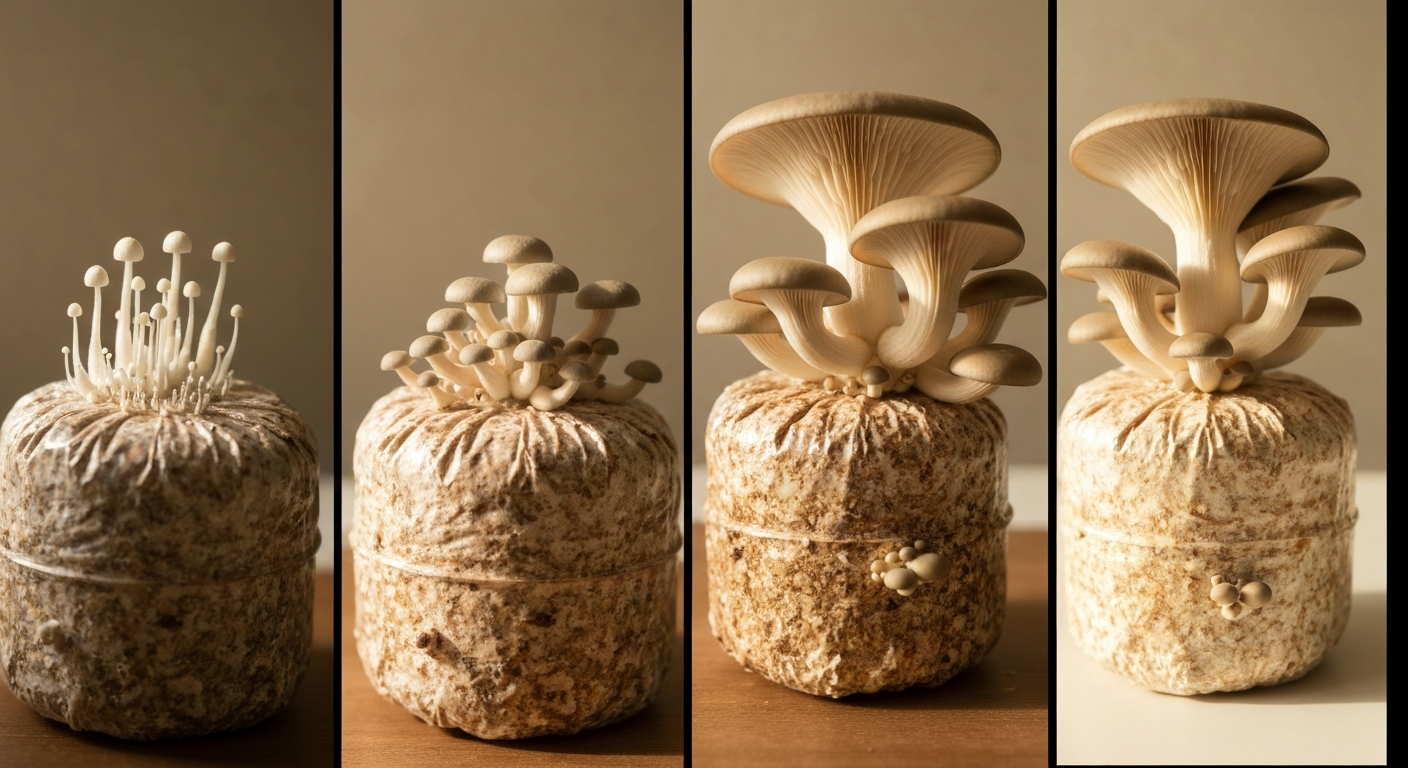
Pinning and Development
Pins are the tiny baby mushrooms that emerge from the substrate surface. They look like small white bumps or dots, sometimes with a slightly grey or blue tinge depending on the species. Seeing your first pins is genuinely one of the most satisfying moments in the hobby. I remember texting my mate a photo of mine at 7 AM like I'd just become a parent.
Pins typically appear 5-10 days after you introduce fruiting conditions, though some species are faster (oysters can pin within 3-4 days) and some are slower. Once pins form, mushroom growth is surprisingly rapid. An oyster cluster can go from pinhead to harvest-ready in 4-7 days.
What to watch for during development:
- Aborted pins. Small pins that stop growing and turn dark. Usually caused by insufficient FAE, temperature swings, or misting directly onto them. A few aborts are normal; if most of your pins are aborting, increase air exchange.
- Fuzzy feet. White fuzzy growth at the base of stems. This means CO2 is too high and the mushrooms are reaching for fresh air. Increase FAE by loosening polyfill or cracking the lid more.
- Long spindly stems with tiny caps. Also a CO2 issue. The mushrooms are stretching toward fresh air. More FAE needed.
- Cracked or dry caps. Humidity too low. Mist the sides of the tub and consider reducing the hole sizes or adding more polyfill.
If you notice signs of contamination at any stage. green, black, or orange patches, foul smells, slimy spots. have a look at the contamination identification guide to work out what's happened and whether the grow is salvageable.
Harvesting Your Mushrooms
Knowing when to harvest is simpler than you'd think. For oyster mushrooms, pick them when the cap edges flatten out and just start to turn upward. before they start dropping spores. Once oysters begin spore-dropping, the caps curl up and they shed a fine white powder everywhere. Still edible, but the texture suffers and the mess is annoying.
How to harvest: Grip the cluster firmly at the base and twist it off the substrate with a slight rocking motion. You want to remove the entire cluster in one piece rather than picking individual mushrooms. A clean removal leaves less stump material behind, which reduces the risk of contamination between flushes.
For species that grow individually rather than in clusters (like king oysters), twist and pull each mushroom at the base, or cut it with a clean knife right at the substrate surface.
Yields to expect from your first grow: A 60-litre monotub with oyster mushrooms will typically give you 400-800g on the first flush. That's roughly £8-16 worth of mushrooms at shop prices from a setup that cost you maybe £30-40 total. The maths gets even better on subsequent grows when you only need to replace grain and substrate.
Getting a Second Flush
After harvesting your first flush, the substrate block still has plenty of nutrients left. Getting a second flush (and sometimes a third) is straightforward:
- Clean up the surface. Remove any leftover stump material and aborted pins.
- Rehydrate. Fill the tub with cold tap water until the substrate block is fully submerged. Weight it down with a plate or clean lid if it floats. Soak for 6-12 hours. I usually do this overnight.
- Drain. Tip out the water, let it drain for 30 minutes, then close the tub back up with fruiting conditions.
- Wait. Second flush pins usually appear within 7-14 days. The flush will be smaller. typically 50-70% of the first flush's yield. but the mushrooms are often denser and meatier.
I routinely get two solid flushes and a patchy third from most grows. After the third flush, yields drop off sharply and contamination risk increases, so I compost the spent substrate at that point.
The beauty of mushroom growing is that once you've done this cycle once, everything clicks. Your second grow will be faster, cleaner, and higher-yielding because you'll understand what proper colonisation looks like, how much to mist (or not), and when to harvest.
If you're thinking about trying different species next, the beginner's guide to gourmet mushrooms covers the best options with detailed pros and cons. And for those curious about whether to stay indoors or try outdoor growing, the indoor vs outdoor growing guide breaks that decision down properly.
Frequently Asked Questions
How long does the entire process from spore to harvest take?
Realistically, you're looking at 6-10 weeks from inoculation to your first harvest, depending on the species. Oyster mushrooms are the fastest. I've had them from spore syringe to harvest in about 5 weeks when conditions were spot on. Shiitake and lion's mane tend to sit at the longer end, closer to 8-10 weeks. The agar stage adds another 1-2 weeks upfront if you go that route, which I'd recommend for reliability.
Can I go straight from a spore syringe to grain without agar?
You can, and plenty of beginners do. Inject 1-2 ml of spore solution directly into your sterilised grain jar and it'll work. The trade-off is you can't see contamination until it's already in your grain, and germination takes longer than transferring established mycelium from agar. For your very first grow, going straight to grain is fine. just accept a slightly higher contamination rate. Once you're comfortable, start using agar as an intermediary step.
What temperature should I keep my grow at?
During colonisation (both grain and bulk substrate), aim for 22-25°C. This is the sweet spot for most gourmet species. For fruiting, most species want a slight drop. 18-22°C is ideal for oysters, shiitake, and lion's mane. King oysters prefer it even cooler at 14-18°C. A cheap seedling heat mat with a thermostat controller (about twenty quid together) handles the colonisation phase nicely. For fruiting, most UK houses in autumn and winter are naturally in the right range.
How much mushroom will I actually get from one grow?
From a single 60-litre monotub with a standard spawn-to-substrate ratio, I typically get 400-800g from the first flush of oyster mushrooms. Second flush adds another 200-400g. Shiitake yields are slightly lower, maybe 300-500g first flush. Your first grow might be on the lower end while you dial in your technique, but even a modest first harvest feels absolutely brilliant when you've grown it from scratch.
Do I need a flow hood or is a still air box enough?
A still air box (SAB) is absolutely enough for a home grower. I used one exclusively for my first two years and had perfectly acceptable contamination rates. maybe one jar in ten. A flow hood is a luxury that makes the process faster and slightly more reliable, but they cost two hundred quid or more. Build a SAB from a large clear plastic tub with two arm holes for about a fiver. It's one of the best cost-to-benefit purchases in the hobby.